London:
Nationwide:
25,000+
Floors Restored
27 Years Experience
Wood Flooring Association Certified
Gluing Hardwood Floors: Your Comprehensive Installation Guide
Posted on June 16, 2023
Hardwood Floors Sanding News
Comprehensive Guide to Gluing Hardwood Floors Installation
Installing hardwood flooring is a popular choice among homeowners due to its timelessness, beauty, and durability. In this blog post, we will focus on one specific installation method: gluing hardwood floors. This method offers numerous benefits that will be thoroughly discussed here.
What is Glued Down Hardwood Flooring?
Glued down hardwood flooring refers to the installation method in which hardwood floors are secured to the subfloor using a special adhesive. The adhesive is typically applied to the subfloor, and then the hardwood planks are firmly pressed down to create a tight bond.
Benefits of Gluing Hardwood Floors
The glue-down installation method offers several significant benefits, which make it a popular choice among both homeowners and professionals.
Stability
Glue provides excellent stability, which is especially important for hardwood floors. Once the glue has cured, the floor becomes incredibly stable and is less likely to move or shift underfoot.
Noise Reduction
Another advantage of gluing hardwood floors is that it significantly reduces noise. The adhesive forms a barrier that helps prevent noise transmission, making it an excellent choice for multi-story buildings.
Suitable for Various Subfloors
Gluing hardwood flooring is compatible with a variety of subfloors, including concrete, plywood, and even old vinyl floors. This makes it a versatile installation method.
Longevity
A correctly installed glued down floor will last for years without the need for significant repairs or replacement, making it a cost-effective option in the long run.
Types of Adhesive for Hardwood Flooring
When it comes to gluing hardwood floors, it’s essential to select the right adhesive. Here are a few common types:Urethane Adhesive
Urethane adhesive is a popular choice for hardwood flooring installation. It offers a strong bond and is water-resistant, making it suitable for areas that may be prone to moisture.
Acrylic Adhesive
Acrylic adhesives are easy to work with and offer excellent bonding strength. They are also known for their low VOC emissions, making them an eco-friendly choice.
Epoxy Adhesive
Epoxy adhesives provide a robust bond and are highly durable. However, they can be more challenging to work with and may not be suitable for DIY installations.
Preparation for Gluing Hardwood Floors
Preparation is a critical step in the installation process. To ensure a successful installation, the following steps are necessary:Evaluate the Subfloor
Before starting, evaluate your subfloor to ensure it’s flat, clean, and dry. Uneven or damp subfloors can lead to issues with the bonding process and the longevity of the flooring.
Acclimatize the Flooring
Before installation, acclimatize your hardwood flooring to the room’s temperature and humidity levels. This step helps prevent future issues like buckling or gapping.
Gather Necessary Tools
Have the right tools on hand. These may include a trowel for applying the adhesive, a tapping block to fit the planks snugly, and a pull bar for tight spaces.
Gluing Down Hardwood Floors: Step-by-Step Guide
Step 1: Layout and Dry Fit
Before applying adhesive, lay out the floorboards to check the fit and plan your design. Make any necessary cuts and adjustments.
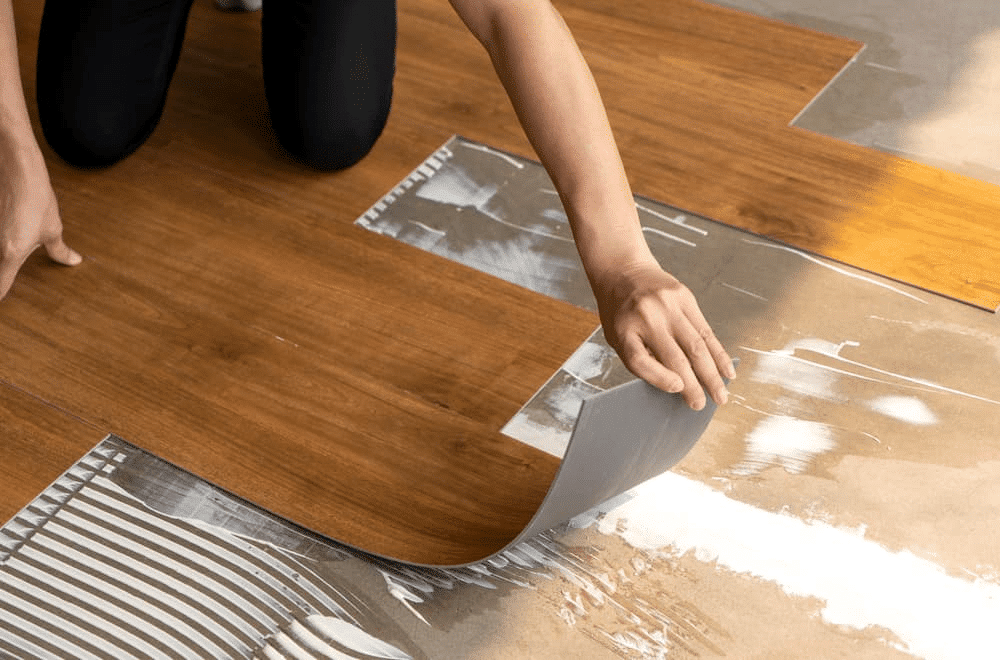
Step 2: Apply the Adhesive
Apply the adhesive to the subfloor using a trowel. Follow the manufacturer’s instructions on the correct amount and spread evenly.
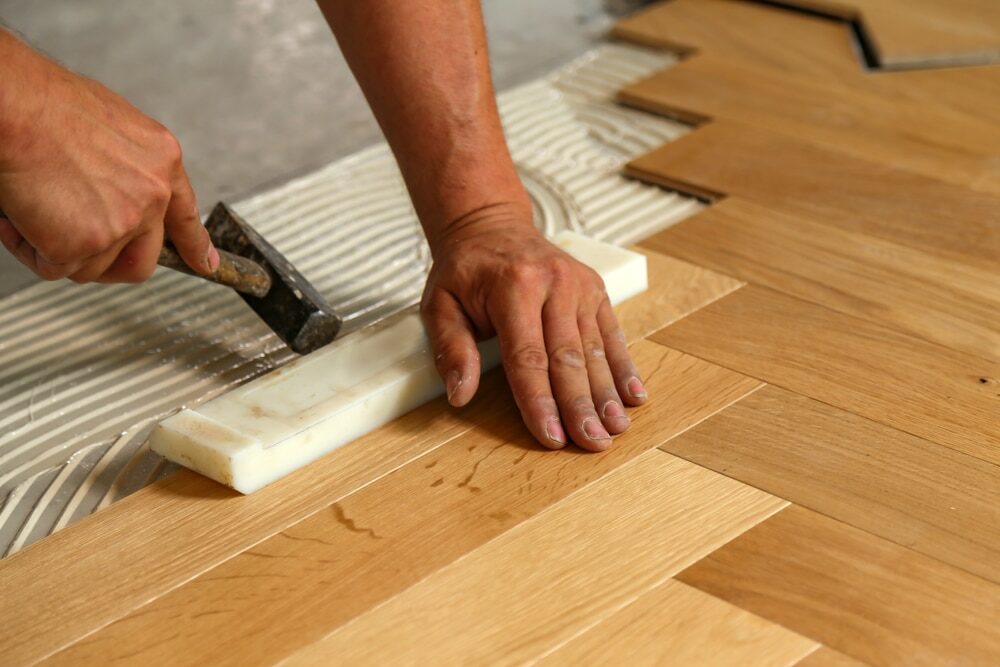
Step 3: Install the Floorboards
Begin installing the floorboards, pressing each one firmly into the adhesive. Use a tapping block to ensure a tight fit.
Step 4: Wipe Excess Adhesive
Wipe away any excess adhesive that oozes up between the planks. It’s easier to clean up the adhesive while it’s still wet.
Step 5: Allow the Adhesive to Cure
Leave the floor undisturbed to allow the adhesive to cure. The curing time can vary depending on the type of adhesive used, but it typically takes between 24-48 hours.
Tips for Successful Gluing Hardwood Floors Installation
Use the Right Trowel
Each adhesive has a recommended trowel notch size to ensure the proper amount of adhesive is used. Using the wrong trowel can result in too much or too little adhesive, both of which can cause problems.
Check for Proper Adhesive Transfer
Lift a floorboard after it’s been placed down to check for proper adhesive transfer. If the adhesive isn’t adequately sticking to the back of the floorboard, you may need to use more adhesive or a different trowel.
Be Mindful of Open Time
Every adhesive has an “open time,” which is the time you can leave the adhesive exposed before laying the floorboards. Exceeding this time can result in a weak bond.
In conclusion, gluing down hardwood floors is an excellent option that provides stability, noise reduction, and a lasting installation. By choosing the right adhesive and following the correct preparation and installation procedures, you can ensure a successful project and enjoy the beauty and durability of your hardwood floors for years to come. Remember, while this process can be a DIY project, hiring a professional can ensure the best result and offer peace of mind.
Some Useful Links:
- Floor Sanding Services
- School Floor Sanding
- Wood Floor Restorations
- Wood Floor Repairs
- Wood Floor Polishing
More from our Blog:
Wood Floor Sanding: A Complete Overview | Mr Sander® Revitalizing Your Parquet Flooring: A Comprehensive Guide London Guide: How to Sand and Varnish Your Wood Floor Essential Guide to Hardwood Floors Refinishing | Top FAQs Answered Mastering Wooden Floor Cleaning: Top Tips & Tricks


Sanding
We provide virtually dust-free sanding with our continuous belt machinery with mobile extraction units, giving you a safer environment for your family.
Oiling
This organic finish not only adds beauty to your home but also has exceptional water-repellent characteristics, making it easier to clean and maintain.
Waxing
This natural floor finish offers the softest and most mellow appearance – and leaves your floor able to breath.
Buffing
Using soft buffing machines (and hand-polishing where required) will bring a wonderful sheen to your newly-finished floor.
Repairs
We offer a full assessment of your wooden floors to determine what repairs are needed to provide the perfect working surface for the later stages of sanding, staining and sealing.
Restoration
We offer a comprehensive restoration process designed to address floors that are improperly fitted or damaged over time through wear and tear.
Request a fixed price quote for your wood floor restoration now
Simply enter your postcode below to get started.
Services
Wood Floor Sanding Wood Floor Restoration Wood Floor Scratch Repair Squeaky Wood Floor Repair Parquet Floor Sanding Parquet Floor Restoration Commercial Floor Sanding Church Floor Sanding Community Centre Floor Sanding School Floor Sanding Gap Filling Gap Filling with ResinCopyright © Mr Sander®
Privacy & Cookies Terms & Conditions Complaints Procedure Cancellation Rights Sitemap

Get An Instant Price Estimate Before You Go…
Simply enter the rooms you need sanded and we’ll provide you with a price estimate instantly! Try our price calculator now.
Get a Price Estimate NowLocal Floor Sanding Experts
Over 500 5-Star Reviews
Safe, Dust Free Sanding
Operating Since 1994